| 
BGP Routing Setup with BGP Communities
This is meant to be an example, and not a complete BGP (Border Gateway Protocol) routing
configuration.
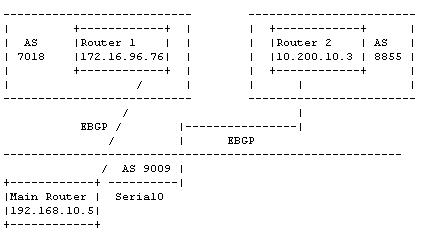
Router Diagram
Ensure that all routers running BGP have at least 256 MB of memory. Remember to save your configurations to flash whenever you are finished configuring your dynamic routing setup! To enable BGP, do the following:
1.
At the Login: prompt, enter root.
2. At the Password: prompt, enter your password.
3. Choose Option 1 (Configuration menu) from the Main Menu. Select Option 6 (Dynamic routing configuration).
4. From the Dynamic Routing Configuration menu, you can see the status of the Dynamic routing (Quagga/Zebra) package. If quagga is running, the option will show "(running)".
5. To start quagga, choose Option 2 (Quagga/Zebra) and choose Option 4 (Start Quagga) from the Dynamic routing (Quagga/Zebra) menu. You will also want to select Option 2 (Enable Quagga service on boot) to ensure that the BGP session will be established at boottime. Ensure that you have configured Quagga prior to attempting to start it. Unless it is properly configured, Quagga will not start.
In our example above, we will be configuring the "Main Router". From the Dynamic routing menu, choose Option 1 (Quagga/Zebra configuration). Our AS for this example will be 9009. Choose Option 4 (Quagga BGP configuration) from the menu. This will open a file in your default editor.
1.
Edit the "router bgp" and "bgp router-id" parameters. In this case, our AS number is 9009 and the router-id is 192.168.10.5.
2. Edit the one "neighbor" section
3. Add additional sections for each external and internal peer
The completed file for our example should look like this (comments beginning with "!" can be deleted):
router bgp 65505
bgp router-id 192.168.10.5
!
!Advertise the 192.168.10.0/24 network
!
network 192.168.10.0/24
!
!AS 7018 Peer
!
neighbor 172.16.96.76 remote-as 7018
!
! Apply all outbound route announcements to filter-list 1
!
neighbor 172.16.96.76 filter-list 1 out
!
! Apply all outbound route announcements to route-map ATTout
!
neighbor 172.16.96.76 route-map ATTout out
neighbor 172.16.96.76 description ATT-peer
!
!AS 8855 Peer
!
neighbor 10.200.10.3 remote-as 8855
!
! Apply all outbound route announcements to filter-list 1
!
neighbor 10.200.10.3 filter-list 1 out
neighbor 10.200.10.3 description ISP-B
!
! Allow only routes with "empty" AS paths
! Only internal routes have empty AS paths
!
ip as-path access-list 1 permit ^$
ip as-path access-list 1 deny all
!
! Append a community string of 7018:20 on outbound announcements
! for any peer that uses route-map "ATTout"
!
route-map ATTout permit 10
set community 7018:20
!
Next, we will need to configure the main Quagga/Zebra configuration file. Choose Option 1 (Quagga/Zebra configuration ) from the Quagga/Zebra configuration menu and Option 1 on the next menu. This will open a file in your default editor that allows you to configure general parameters.
1.
The "hostname" value should be set to the host name of the router configured in the Global Configuration.
2. The "password" value should be set to the password for limited, non-enabled access to the Quagga/Zebra CLI.
3. The "enable password" should be set to the password for full, enabled access to the Quagga/Zebra CLI.
4. The configuration file should contain an "interface" section for each interface used with dynamic routing protocols. In this example, only Serial0 is configured. Each section should have an "interface" command an an "ip address" command at a minimum.
5. Optionally, you can specify the location for a log file. This option should only be enabled on a temporary basis for debugging purposes, since the log could potentially fill up the router's virtual filesystem.
The completed file for our example should look like this:
!
hostname Router
password zebra
enable password zebra
!
! Interface's description.
!
interface Serial0
ip address 192.168.10.5/24
!
!log file /var/log/zebra.log
Remember to save your configurations to flash whenever you are finished configuring your dynamic routing setup! |